Customize Consent Preferences

We use cookies to help you navigate efficiently and perform certain functions. You will find detailed information about all cookies under each consent category below.

The cookies that are categorized as "Necessary" are stored on your browser as they are essential for enabling the basic functionalities of the site. ... 

Always Active

Necessary cookies are required to enable the basic features of this site, such as providing secure log-in or adjusting your consent preferences. These cookies do not store any personally identifiable data.

No cookies to display.

Functional cookies help perform certain functionalities like sharing the content of the website on social media platforms, collecting feedback, and other third-party features.

No cookies to display.

Analytical cookies are used to understand how visitors interact with the website. These cookies help provide information on metrics such as the number of visitors, bounce rate, traffic source, etc.

No cookies to display.

Performance cookies are used to understand and analyze the key performance indexes of the website which helps in delivering a better user experience for the visitors.

No cookies to display.

Advertisement cookies are used to provide visitors with customized advertisements based on the pages you visited previously and to analyze the effectiveness of the ad campaigns.

No cookies to display.

๐Ÿ”ฅLimited-Time Discounts Available!

Recommended Services
Supported Scripts

How to set up Outlook to send and receive with a MailWish business email account.

We donโ€™t recommend setting up Outlook. Instead, we recommend using our built-in webmail(Mailbux โ€“ https://mailbux.com) to unlock all the features, such as Files, Docs, and more apps. However, if you still want to achieve this, you can follow the guide below:

  1. To synchronize your emails with IMAP or POP3 you need to activate this feature in your mailwish.net business email account. Click Email โ†’ Settings โ†’ POP3 & IMAP โ†’ Enable access to this account via POP3 and IMAP. Confirm the altered settings by clicking Save and start your external email program.
  2. Click File โ†’ Info โ†’ Add account.
    The Outlook wizard for setting up a new account will open.
  3. Enter an email address to add your account.
  4. Click Advanced options and check the box for Let me set up my account manually.
  5. Click Connect.
  6. Choose the account type IMAP.
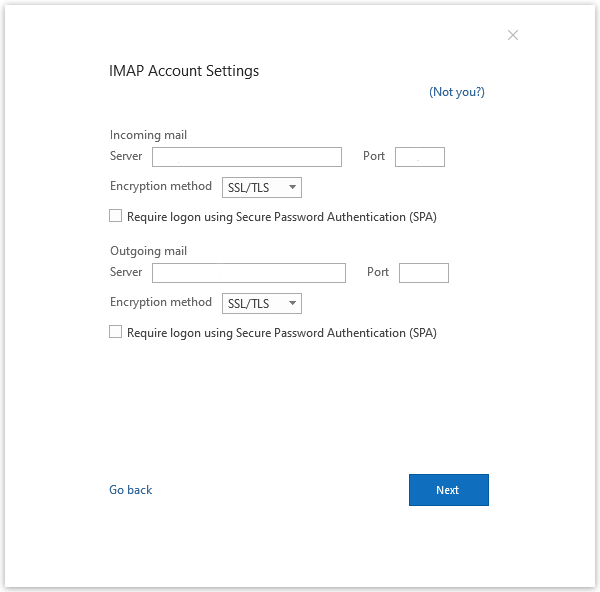
    The dialog IMAP Account Settings will open up.
  7. Use the following settings:
    1. Incoming mail: Server mail.mailwish.net with port 993 and check the option This server requires an encrypted connection (SSL/TLS)
    2. Outgoing mail: Server mail.mailwish.net with port 587 and the encryption method STARTTLS

Share this Post

Leave a Reply